Business Reports with R Markdown
How to better theme report ?
Christophe Dervieux
R Enterprise Meetup - 05/10/2021
Guidelines are usually colors, fonts, size but can also be document template.
We'll try cover most formats from HTML to Office Document
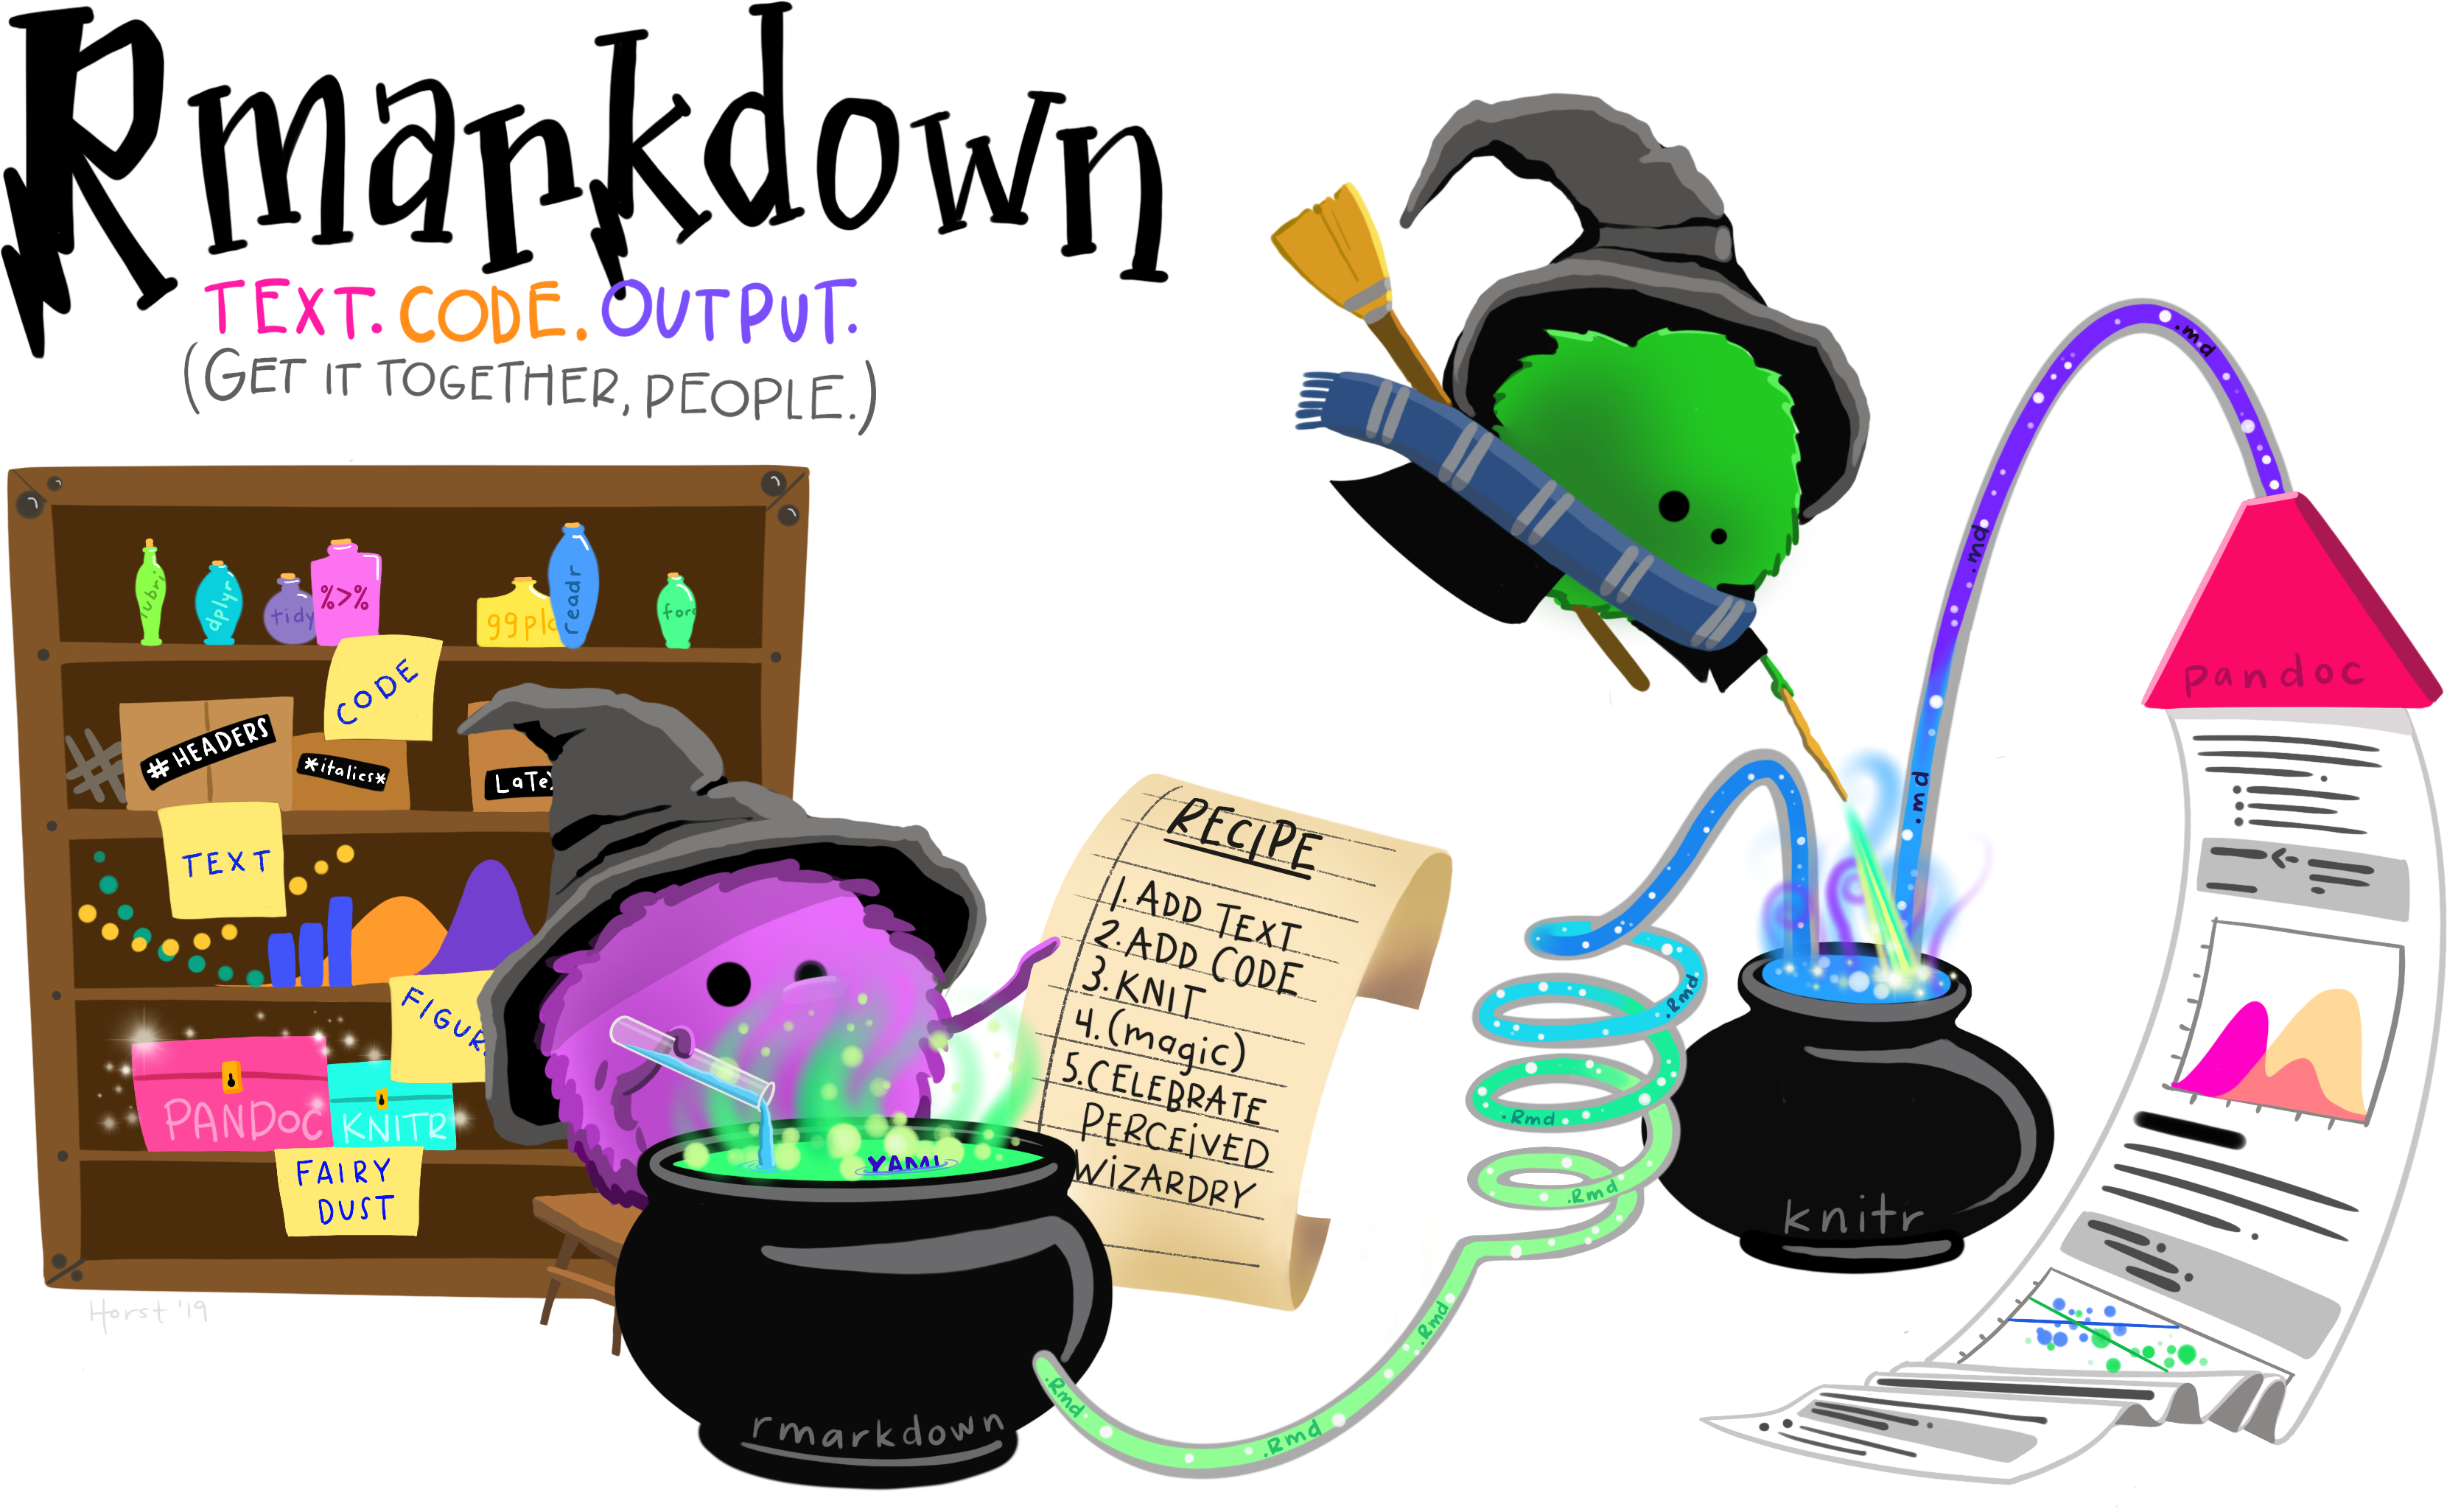
We often see these rmarkdown little wizard mixing Text & Code to produce document. Aim is to look deeper into this today. This is not so magic. It is juts perceived magic and there are tools to know about under the hood to be able to customize behavior further. And it is important to know about this for styling.
What happens when it renders ?

source: R Markdown Cookbook
knitr::knit() + Pandoc (+ LaTeX) = rmarkdown::render()
rmarkdown will run Pandoc & knitr for you so one input for multiple output possible. But stylings is specific to the output.
This is important to know all this because it helps know where to look and what could be tweak. one has to understand what to tweak to make something works as expected.

Let's talk about styling content now.
Working with HTML output
Styling with CSS
Cascading Stylesheets
What is CSS ?
While HTML is used to define the structure and semantics of your content, CSS is used to style it and lay it out.
For example, you can use CSS to alter the font, color, size, and spacing of your content, split it into multiple columns, or add animations and other decorative features.
Source: https://developer.mozilla.org/en-US/docs/Learn/CSS
Styling HTML output will require more or less CSS skills
If you have those skills, here what you can do
Use CSS from inside a Rmd file
About the css chunk engine
```{css, echo = FALSE}/* add a blue border */div.mybox { border-color: blue; border-style: solid; padding: 0.5em; text-align: center;}/* Set to blue bold text inside the box */div.mybox strong { color: blue;}```Applied directly in the Rmd document without an external css file
Useful for prototyping, for quick iteration, for single file example echo = false is important if you don't want to show CSS source chunk in output
You can also use the css argument of html_document()
But with CSS files it can be hard to create theme file you can reuse.
Enter SASS
Use SASS the same way
About the sass/scss engine
What is SASS ?
Sass (https://sass-lang.com) is a CSS extension language that allows you to create CSS rules in much more flexible ways than you would do with plain CSS.
It allows for variables, tweaking functions (called mixins), operations (like /), better CSS rule organisation (nesting, extensions, ...) and more.
NEW WAY
External tool used by web developers. Very powerful and this is a skill to learn when doing a lot of HTML. It can do a lot !
But no need to use it directly. Still need to learn the feature and syntax.
Use SASS the same way
About the sass/scss engine
```{css, echo = FALSE}div.mybox { border-color: blue; border-style: solid; padding: 0.5em; text-align: center;}div.mybox strong { color: blue;}``````{scss, echo = FALSE}$color1: blue;div { &.mybox { border-color: $color1; border-style: solid; padding: 0.5em; text-align: center; strong { color: $color1; } }}```The CSS is the one that would be render when using sass on the .scss or .sass file.
No preference on the syntax - it is a personnal choice (and depending on environment.)
Quite new. Allow to use SASS from R. Wrapper around a C library.
Supported in rmarkdown now.
Use SASS the same way
Powered by the new sass R 📦
External .scss file can also be passed in the css argument of most output format like html_document()
output: html_document: css: custom-style.scssThe file will be processed internally by sass::sass_file() and produce a .css automatically.
Using a .scss file makes it easier to use variables and rules in CSS.
Use variables to store style guide values and use theme in several places.
You can do much more with SASS. It pushes the limit of customization of a document.
You can easily apply style on component identified by class or id, attributes.
HTML is the way to structure but Pandoc Markdown will simplify that.
Apply custom style on specific component
Powered by Pandoc Markdown syntax
Creating custom blocks (using Pandoc's Fenced Divs)
::: myboxSpecial **important** content:::With the previous style applied, it will result in this box in the document
Special important content
<div class="mybox"><p>Special <strong>important</strong> content</p></div>Pandoc feature. R Markdown knows and extend it. Quite simple to write but quite powerful.
Supported by Visual editor.
Apply custom style on specific component
Powered by Pandoc Markdown syntax
Using attributes on element works too (with Pandoc's Bracketed Spans)
[This is *some text*]{.my-bg-blue lang="en"}Applying this style:
.my-bg-blue { background: lightblue;}will result in:
This is some text
<p><span class="my-bg-blue" lang="en">This is <em>some text</em></span></p>Going further with Bootstrap
Powered by the new bslib R 📦
bslib provides tools for customizing Bootstrap themes directly from R. It allows take custom theming easier and provide easy access to pre-packaged Bootswatch themes.
Supported in R Markdown output format:
rmarkdown::html_document()(usingthemeargument)flexdashboard::flex_dashboard()(current dev version > 0.5.2)bookdown::bs4_book()built on Bootstrap 4
Supported in other tools:
- DT (since 0.18)
- shiny (since 1.6.0)
- pkgdown (current dev version > 1.6.1)
rmarkdown still doesn't use bslib by default: Simple example to activate Bootstrap 4 in html_document() with bslib and default style
# Using bootswatch rmarkdown theme, # with included Bootstrap 3 (not bslib)output: html_document: theme: cerulean# Activate the use of bslib, # with Bootstrap version 4 and not bootswatch themeoutput: html_document: theme: version: 4# Activate the use of bslib, # with Bootstrap version 4 and bootswatch themeoutput: html_document: theme: bootswatch: ceruleanHow does that work ?
Showing a full example
Using variables in YAML instead of a .scss file...
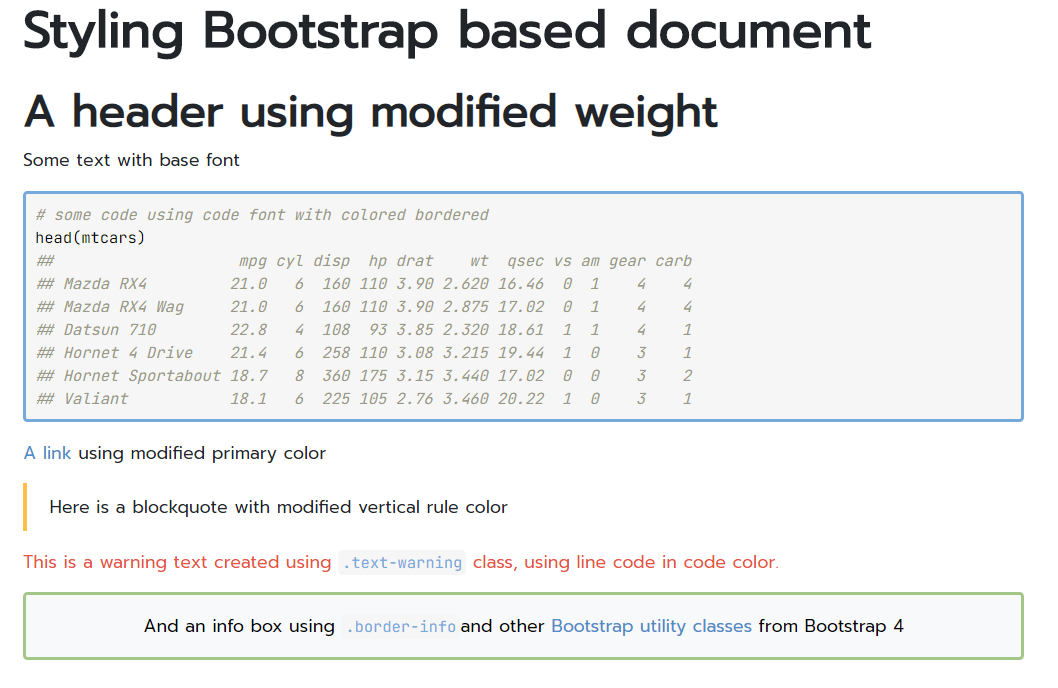
output: html_document: theme: primary: "#4D8DC9" # Changing primary color to blue secondary: "#4D4D4D" # Changing secondary to grey blockquote-border-color: "#FDBE4B" # Styling specific blockquote part to yellow lightblue: "#75AADB" # definining another blue as variable to reuse code-color: "$lightblue" # inline code color will be blue border-color: "$lightblue" # as default border color border-width: "3px" # increasing border width warning: "#E7553C" # warning-like text will be orange info: "#A4C689" # info like text will be green headings-font-weight: 900 # increasing heading font weight base_font: google: "Prompt" # changing base font code_font: google: "JetBrains Mono" # changing code fontBootstrap is not for all outputs (xaringan, reveal, tufte, does not use for example)
We aim at making that even easier by creating a common theming system for all outputs where you could easily define vairables and rules and apply theme across output.
Useful resources
Going further with HTML styling in R
Customizing flexdashboard (development version): https://pkgs.rstudio.com/flexdashboard/articles/theme.html
Styling new
bookdown::bs4_book(): https://bookdown.org/yihui/bookdown/html.html#bs4-bookUsing bslib: https://pkgs.rstudio.com/bslib
Using sass: https://pkgs.rstudio.com/sass
Styling pkgdown (development version): https://pkgdown.r-lib.org/dev/articles/customization.html
Working with Office document
Styling Word and Powerpoint
Using template reference document
Using a reference document as template with R Markdown
output: word_document: reference_doc: template.docxoutput: powerpoint_presentation: reference_doc: template.pptxOne way to create a template:
Render once without reference document
Save the resulting output as the reference doc
Modify the reference document to customize according to your style
Use the document as reference doc
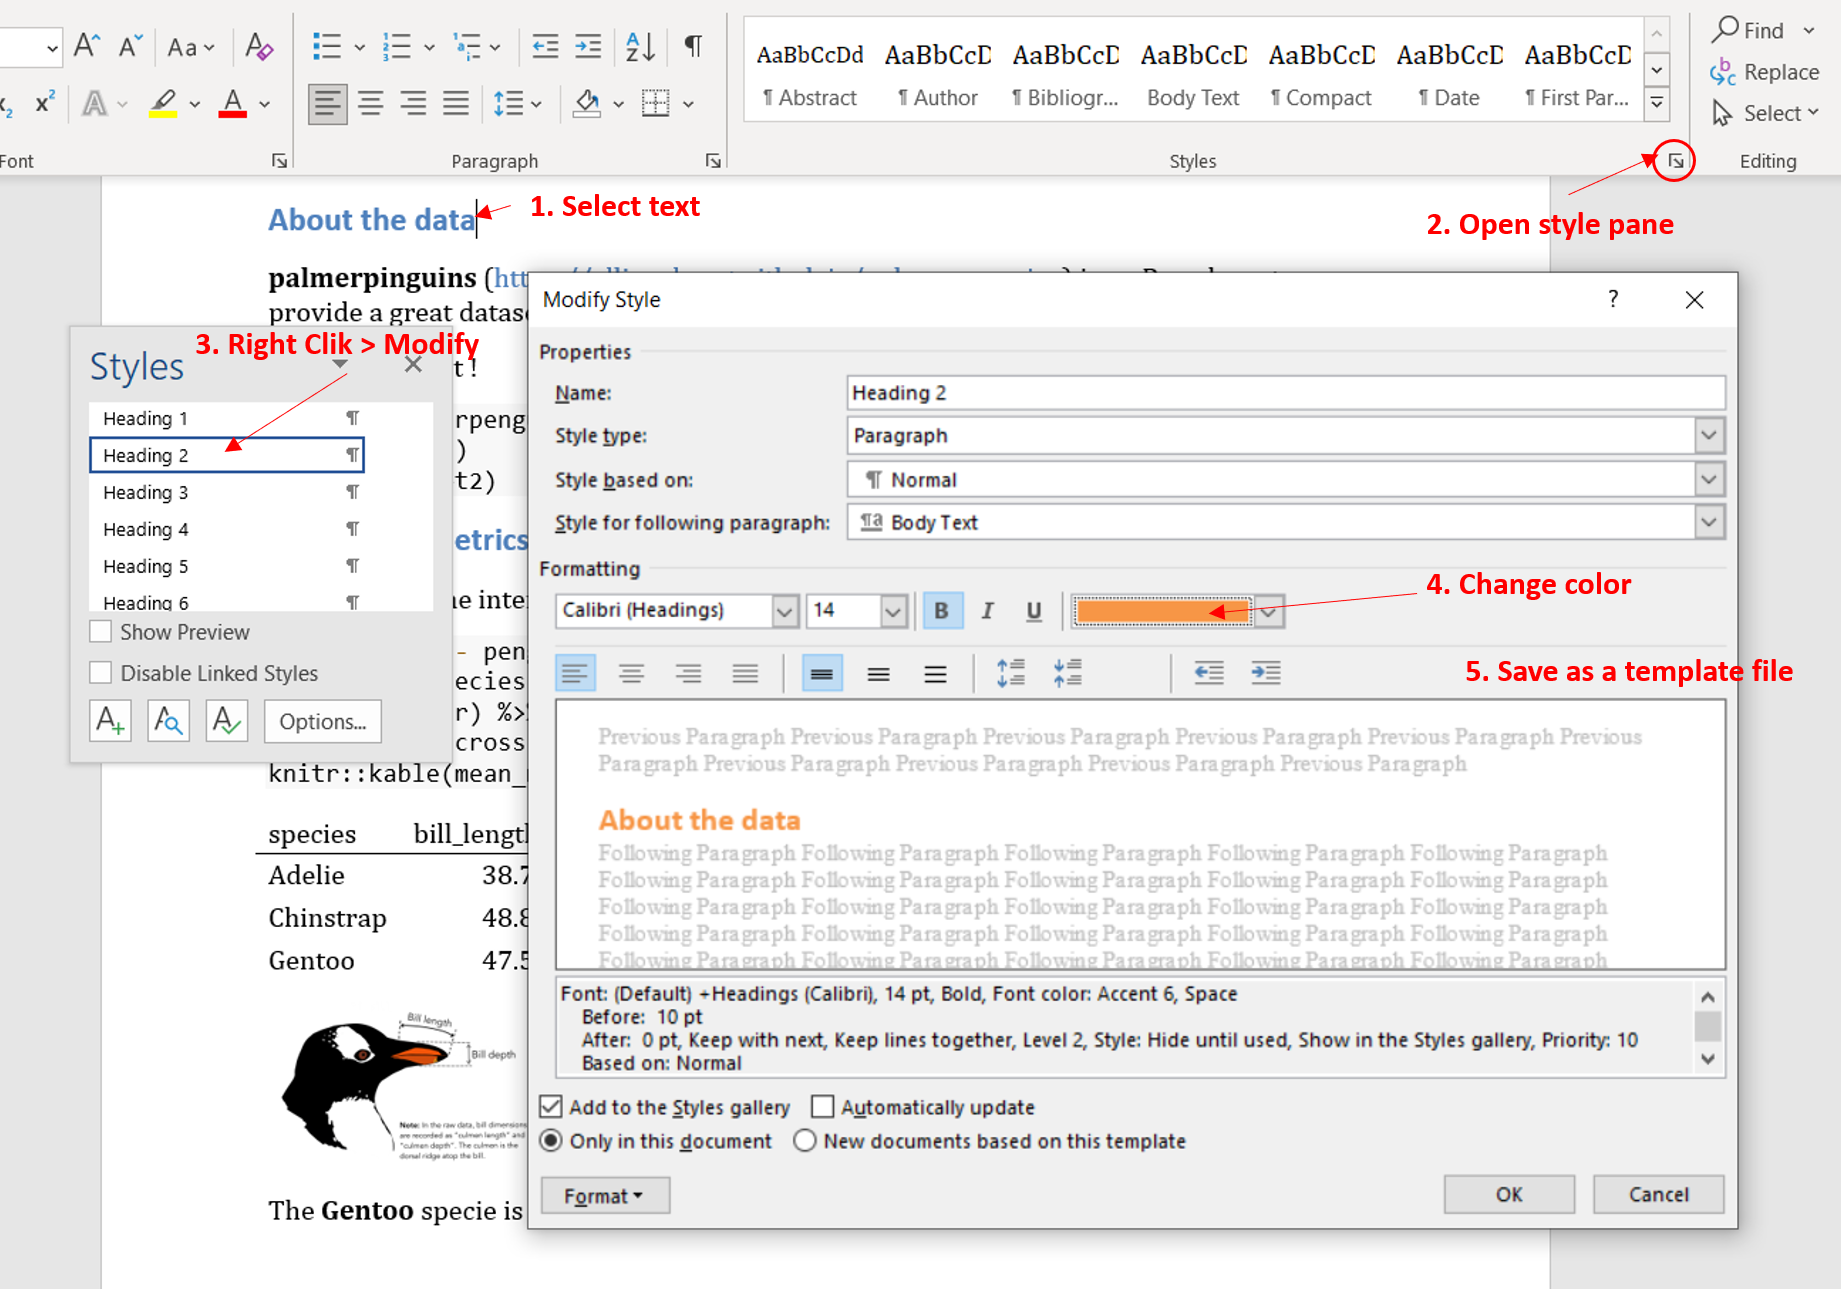
Example with Word Document
You can customize default style set in Headers, paragraph or else.
Styling Word and Powerpoint
How to apply custom style ?
Using Div & Spans from Pandoc Markdown syntax.
Using fenced div attributes
for Paragraph style
::: {custom-style="highlight-box"}The **`r heaviest_specie`** specie is heavier than other ! :::Using Spans attributes
for Text style:
[One of the species lives on all islands]{custom-style="Emphatically"} and the others are specific to one island only.This will associate Docx Styles name to the text. Style can then be modified in template.
Documentation:
Examples:
Styling Word and Powerpoint
Limitations & Beyond
It is powered by Pandoc
- We're limitated by their features - not everything can be customized.
- But we worked this summer with Pandoc team to improve Powerpoint templating mechanism.
Unfortunatly, styling Office Document is not easy (through Pandoc or not)
- One must know about Office Style system
- Simple customization works, more complex may not
Other great tools for R users
Officeverse by David Gohel
https://ardata-fr.github.io/officeverse
Working with PDF document
What about PDF output ?
Producing PDF
Creating PDF through LaTeX
Styling needs to be done using TeX styling mechanism, with help of CTAN packages.
Creating PDF through HTML
🎉 CSS can be used !
Two solutions:
Printing document as-is
Formating and Styling HTML specifically for printing (using Paged Media CSS)
What about PDF output ?
About Paged Media CSS with R
Paginate the HTML Output of R Markdown with CSS for Print https://github.com/rstudio/pagedown
pagedown brings Paged.js to R, a free and open source JavaScript library that paginates content in the browser to create PDF output from any HTML content.
📽 RSTUDIO::CONF 2019 Talk by Yihui Xie 📽
pagedown: Creating beautiful PDFs with R Markdown and CSS (RSTUDIO::CONF 2019)
and more examples in Github README
pagedown is the tool to make paginated HTML from R but designing paged report can be tricky.
What we've learn so far ?
Let's sum up!
Customize HTML output using CSS, SASS or Bootstrap variables with bslib
Using templates for Office outputs using Pandoc
Create and style custom blocks for HTML and office outputs using Pandoc Markdown
Create PDF from HTML to benefit from CSS styling
Paginated HTML is a thing, and can be done from R using pagedown


